How to build, install and create a tar.xz of a Hello World program

This tutorial will demonstrate how to:

  • create a small "Hello, World" application using Python and GTK+

  • make the .desktop file

  • how to set up the build system

Create the program

Libraries to import

from gi.repository import Gtk
import sys

In order for our script to work with GNOME, we need to import GNOME libraries via GObject Introspection. Here we import the language bindings and GTK+, the library which contains the graphical widgets used to make GNOME applications.

Creating the main window for the application

class MyWindow(Gtk.ApplicationWindow):

    # constructor for a Gtk.ApplicationWindow
    def __init__(self, app):
        Gtk.Window.__init__(self, title="Hello World!", application=app)
        self.set_default_size(200, 100)

class MyApplication(Gtk.Application):
    def __init__(self):
        Gtk.Application.__init__(self)

    def do_activate(self):
        win = MyWindow(self)
        win.show_all()

    def do_startup(self):
        Gtk.Application.do_startup(self)

Gtk.Application initializes GTK+. It also connects the x button that's automatically generated along with the window to the "destroy" signal.

We can start building our first window. We do this by creating a class called MyWindow and assigning it a Gtk.ApplicationWindow.

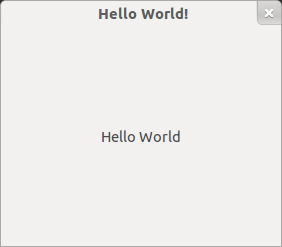
We give the window a property called title. The title can be any string you want it to be. To be on the safe side, it's best to stick to UTF-8 encoding.

Now we have a window which has a title and a working "close" button. Let's add the actual "Hello World" text.

Label for the window

# Add a label widget to your window

        # create a label
        label = Gtk.Label()

        # set the text of the label
        label.set_text("Hello GNOME!")

        # add the label to the window
        self.add(label)

A text label is one of the GTK+ widgets we can use, on account of having imported the GTK+ library. To use it, we create a variable called label and set the text that the label will hold. Finally, we create and run the application:

#run the application

app = MyApplication()
exit_status = app.run(sys.argv)
sys.exit(exit_status)

Gtk.ApplicationWindow can only hold one widget at a time. To construct more elaborate programs you need to create a holder widget like Gtk.Grid inside the window, and then add all the other widgets to it.

hello-world.py

The complete file:

1
2
3
4
5
6
7
8
9
10
11
12
13
14
15
16
17
18
19
20
21
22
23
24
25
26
27
28
29
30
31
32
33
34
from gi.repository import Gtk
import sys


class MyWindow(Gtk.ApplicationWindow):
    # constructor for a Gtk.ApplicationWindow

    def __init__(self, app):
        Gtk.Window.__init__(self, title="Welcome to GNOME", application=app)
        self.set_default_size(200, 100)

        # create a label
        label = Gtk.Label()
        # set the text of the label
        label.set_text("Hello GNOME!")
        # add the label to the window
        self.add(label)


class MyApplication(Gtk.Application):

    def __init__(self):
        Gtk.Application.__init__(self)

    def do_activate(self):
        win = MyWindow(self)
        win.show_all()

    def do_startup(self):
        Gtk.Application.do_startup(self)

app = MyApplication()
exit_status = app.run(sys.argv)
sys.exit(exit_status)

Running the application from terminal

To run this application, first save it as hello-world.py. Then open Terminal, go to the folder where your application is stored and run:

$ python hello-world.py

The .desktop.in file

Running applications from the Terminal is useful at the beginning of the application making process. To have fully working application integration in GNOME 3 requires a desktop launcher. For this you need to create a .desktop file. The .desktop file describes the application name, the used icon and various integration bits. A deeper insight into the .desktop file can be found here. The .desktop.in file will create the .desktop.

The example shows you the minimum requirements for a .desktop.in file.

1
2
3
4
5
6
7
8
9
10
11
[Desktop Entry]
Version=1.0
Encoding=UTF-8
Name=Hello World
Comment=Say Hello
Exec=@prefix@/bin/hello-world
Icon=application-default-icon
Terminal=false
Type=Application
StartupNotify=true
Categories=GNOME;GTK;Utility;

Now let's go through some parts of the .desktop.in file.

Name

The application name.

Comment

A short description of the application.

Exec

Specifies a command to execute when you choose the application from the menu. In this example exec just tells where to find the hello-world file and the file takes care of the rest.

Terminal

Specifies whether the command in the Exec key runs in a terminal window.

To put your application into the appropriate category, you need to add the necessary categories to the Categories line. More information on the different categories can be found in the menu specification.

In this example we use an existing icon. For a custom icon you need to have a .svg file of your icon, stored in /usr/share/icons/hicolor/scalable/apps. Write the name of your icon file to the .desktop.in file, on line 7. More information on icons in: Installing Icons for Themes and on freedesktop.org: Specifications/icon-theme-spec.

The build system

To make your application truly a part of the GNOME 3 system you need to install it with the help of autotools. The autotools build will install all the necessary files to all the right places.

For this you need to have the following files:

autogen.sh

1
2
3
4
5
6
7
8
9
10
11
12
13
14
15
16
17
18
#!/bin/sh

set -e

test -n "$srcdir" || srcdir=`dirname "$0"`
test -n "$srcdir" || srcdir=.

olddir=`pwd`
cd "$srcdir"

# This will run autoconf, automake, etc. for us
autoreconf --force --install

cd "$olddir"

if test -z "$NOCONFIGURE"; then
  "$srcdir"/configure "$@"
fi

After the autogen.sh file is ready and saved, run:

$ chmod +x autogen.sh

Makefile.am

1
2
3
4
5
6
7
8
9
10
11
# The actual runnable program is set to the SCRIPTS primitive.
# # Prefix bin_ tells where to copy this
bin_SCRIPTS = hello-world.py
# # List of files to be distributed
EXTRA_DIST=  \
	$(bin_SCRIPTS)
#
#     # The desktop files
desktopdir = $(datadir)/applications
desktop_DATA = \
	hello-world.desktop

configure.ac

1
2
3
4
5
# This file is processed by autoconf to create a configure script
AC_INIT([Hello World], 1.0)
AM_INIT_AUTOMAKE([1.10 no-define foreign dist-xz no-dist-gzip])
AC_CONFIG_FILES([Makefile hello-world.desktop])
AC_OUTPUT

README

Information users should read first. This file can be blank.

When you have the hello-world, hello-world.desktop.in, Makefile.am, configure.ac and autogen.sh files with correct information and rights, the README file can include the following instructions:

1
2
3
4
5
6
7
8
9
10
11
12
13
14
15
16
17
18
19
20
21
22
23
24
25
26
27
28
29
30
31
32
33
34
35
To build and install this program:

./autogen.sh --prefix=/home/your_username/.local
make install

-------------
Running the first line above creates the following files:

aclocal.m4
autom4te.cache
config.log
config.status
configure
hello-world.desktop
install-sh
missing
Makefile.in
Makefile

Running "make install", installs the application in /home/your_username/.local/bin
and installs the hello-world.desktop file in /home/your_username/.local/share/applications

You can now run the application by typing "Hello World" in the Overview.

----------------
To uninstall, type:

make uninstall

----------------
To create a tarball type:

make distcheck

This will create hello-world-1.0.tar.xz