Multiple-item Containers
Multiple-item container widgets have other methods than set_child() and unset_child(). Different containers can have different methods for adding and removing child widgets. For instance, Gtk::Box has append() and remove() as well as other methods. The remove() method for multiple-item containers takes an argument, specifying which widget to remove.
- IX.II.I. Empaquetage
- IX.II.II. Un Hello World amélioré
- IX.II.III. Boîtes
- IX.II.IV. Grille
- IX.II.V. Bloc-note
- IX.II.VI. Assistant
- IX.II.VII. Other Multi-item Containers
IX.II.I. Empaquetage
Vous avez probablement remarqué que les fenêtres gtkmm semblent « élastiques » — elles peuvent être étirées de diverses manières. Cette propriété résulte du système « d'empaquetage des éléments graphiques ».
Beaucoup de boîtes à outils GUI exigent que les éléments graphiques soient placés avec précision dans une fenêtre, avec un positionnement absolu, souvent en utilisant un utilitaire visuel. Plusieurs problèmes en découlent :
- Les éléments graphiques ne se réarrangent pas par eux-mêmes quand la fenêtre est redimensionnée. Certains éléments graphiques sont masqués quand la fenêtre est rapetissée et des espaces libres inutiles apparaissent quand la fenêtre est agrandie.
- Il n'est pas possible de prévoir l'espace nécessaire à un texte après traduction en d'autres langues ou après affichage avec une police différente. Sur Unix, il est également impossible d'anticiper les effets de chaque thème ou de chaque gestionnaire de fenêtres.
- Modifier la disposition d'une fenêtre « à la volée », pour faire apparaître quelques éléments graphiques supplémentaires, par exemple, est compliqué. Cela demande un nouveau calcul ennuyeux de la position de chaque élément graphique.
gtkmm uses the packing system to solve these problems. Rather than specifying the position and size of each widget in the window, you can arrange your widgets in rows, columns, and/or grids. gtkmm can size your window automatically, based on the sizes of the widgets it contains. And the sizes of the widgets are, in turn, determined by the amount of text they contain, or the minimum and maximum sizes that you specify, and/or how you have requested that the available space should be shared between sets of widgets. You can perfect your layout by specifying margins and centering values for each of your widgets. gtkmm then uses all this information to resize and reposition everything sensibly and smoothly when the user manipulates the window.
gtkmm arranges widgets hierarchically, using containers. A container widget contains other widgets. Most gtkmm widgets are containers. Windows, Notebook tabs, and Buttons are all container widgets. There are two flavours of containers: single-child containers and multiple-child containers. Most container widgets in gtkmm are single-child containers, including Gtk::Window.
Yes, that's correct: a Window can contain at most one widget. How, then, can we use a window for anything useful? By placing a multiple-child container in the window. The most useful container widgets are Gtk::Grid and Gtk::Box.
- Gtk::Grid arranges its child widgets in rows and columns. Use attach() and attach_next_to() to insert child widgets.
- Gtk::Box arranges its child widgets vertically or horizontally. Use append() to insert child widgets.
Il existe plusieurs autres conteneurs. Nous en parlerons également.
Si vous n'avez jamais utilisé auparavant un utilitaire d'empaquetage, son utilisation nécessitera une prise en main. Toutefois, vous constaterez probablement que, contrairement à d'autres boîtes à outils, il n'y a pas besoin de faire appel à un éditeur de type visuel.
IX.II.II. Un Hello World amélioré
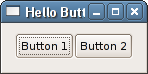
Regardons un helloworld légèrement perfectionné en se servant de nos nouvelles connaissances.
File: helloworld.h (For use with gtkmm 4)
#ifndef GTKMM_EXAMPLE_HELLOWORLD_H
#define GTKMM_EXAMPLE_HELLOWORLD_H

#include <gtkmm/box.h>
#include <gtkmm/button.h>
#include <gtkmm/window.h>

class HelloWorld : public Gtk::Window
{
public:
  HelloWorld();
  ~HelloWorld() override;

protected:

  // Signal handlers:
  // Our new improved on_button_clicked().
  void on_button_clicked(const Glib::ustring& data);

  // Child widgets:
  Gtk::Box m_box1;
  Gtk::Button m_button1, m_button2;
};

#endif // GTKMM_EXAMPLE_HELLOWORLD_H
File: main.cc (For use with gtkmm 4)
#include "helloworld.h"
#include <gtkmm/application.h>

int main(int argc, char* argv[])
{
  auto app = Gtk::Application::create("org.gtkmm.example");

  //Shows the window and returns when it is closed.
  return app->make_window_and_run<HelloWorld>(argc, argv);
}
File: helloworld.cc (For use with gtkmm 4)
#include "helloworld.h"
#include <iostream>

HelloWorld::HelloWorld()
: m_button1("Button 1"),
  m_button2("Button 2")
{
  // This just sets the title of our new window.
  set_title("Hello Buttons!");

  // Sets the margin around the box.
  m_box1.set_margin(10);

  // put the box into the main window.
  set_child(m_box1);

  // Now when the button is clicked, we call the on_button_clicked() function
  // with a pointer to "button 1" as its argument.
  m_button1.signal_clicked().connect(sigc::bind(
              sigc::mem_fun(*this, &HelloWorld::on_button_clicked), "button 1"));

  // We use Gtk::Box::append() to pack this button into the box,
  // which has been packed into the window.
  // A widget's default behaviour is not to expand if extra space is available.
  // A container widget by default expands if any of the contained widgets
  // wants to expand.
  m_box1.append(m_button1);
  m_button1.set_expand();

  // call the same signal handler with a different argument,
  // passing a pointer to "button 2" instead.
  m_button2.signal_clicked().connect(sigc::bind(
              sigc::mem_fun(*this, &HelloWorld::on_button_clicked), "button 2"));

  m_box1.append(m_button2);
  m_button2.set_expand();

  // Gtk::Widget::show() is seldom needed. All widgets are visible by default.
}

HelloWorld::~HelloWorld()
{
}

// Our new improved signal handler.  The data passed to this method is
// printed to stdout.
void HelloWorld::on_button_clicked(const Glib::ustring& data)
{
  std::cout << "Hello World - " << data << " was pressed" << std::endl;
}
After building and running this program, try resizing the window to see the behaviour. Also, try playing with set_expand(), set_hexpand(), set_vexpand(), set_halign() and set_valign() while reading the Boxes section.
IX.II.III. Boîtes
Most packing uses boxes as in the above example. These are invisible containers into which we can pack our widgets. When packing widgets into a horizontal box, the objects are inserted horizontally from left to right. In a vertical box, widgets are packed from top to bottom. You may use any combination of boxes inside or beside other boxes to create the desired effect.
- IX.II.III.I. Ajout d'éléments graphiques
- IX.II.III.II. Gtk::Application and command-line options
- IX.II.III.III. Exemple
IX.II.III.I. Ajout d'éléments graphiques
- IX.II.III.I.I. Options d'empaquetage par enfant
- IX.II.III.I.II. Options d'empaquetage par conteneur
IX.II.III.I.I. Options d'empaquetage par enfant
The append() method places widgets inside these containers. It will start at the top and work its way down in a Box with vertical orientation, or pack left to right in a Box with horizontal orientation. If it's inconvenient to add widgets in this order, use insert_child_after() or insert_child_at_start(). We will use append() in our examples.
There are several options governing how widgets are to be packed, and this can be confusing at first. You can modify the packing by using set_expand(), set_hexpand(), set_vexpand(), set_halign(), set_valign() and/or set_margin() on the child widgets. If you have difficulties, then it is sometimes a good idea to play with the glade GUI designer to see what is possible. You might even decide to use the Gtk::Builder API to load your GUI at runtime.
À la base, il y cinq styles différents comme illustré dans cette figure :
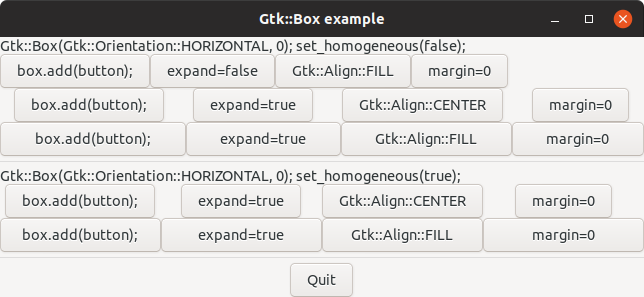
Each line contains one horizontal Box with several buttons. Each of the buttons on a line is packed into the Box with the same arguments to the set_hexpand(), set_halign(), set_margin_start() and set_margin_end() methods.
IX.II.III.I.II. Options d'empaquetage par conteneur
Here's the constructor for the Box widget, and methods that set per-container packing options:
Gtk::Box(Gtk::Orientation orientation = Gtk::Orientation::HORIZONTAL, int spacing = 0);
void set_orientation(Gtk::Orientation orientation);
void set_spacing(int spacing);
void set_homogeneous(bool homogeneous = true);
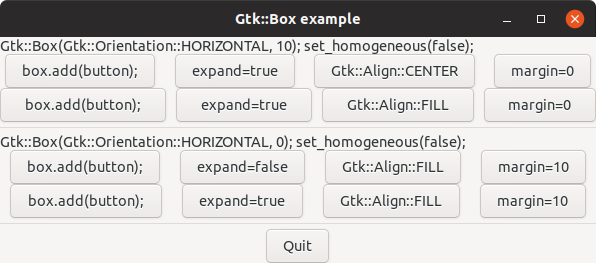
What's the difference between spacing (set when the box is created) and margins (set separately for each child widget)? Spacing is added between objects, and margins are added on one or more sides of a widget. The following figure should make it clearer. The shown margins are the left and right margins of each button in the row.
IX.II.III.II. Gtk::Application and command-line options
The following example program requires a command-line option. The source code shows two ways of handling command-line options in combination with Gtk::Application.
Handle the options in main() and hide them from Gtk::Application by setting argc = 1 in the call to Gtk::Application::run().
-
Give all command-line options to Gtk::Application::run() and add the flag Gio::Application::Flags::HANDLES_COMMAND_LINE to Gtk::Application::create(). Connect a signal handler to the command_line signal, and handle the command-line options in the signal handler.
You must set the optional parameter after = false in the call to signal_command_line().connect(), because your signal handler must be called before the default signal handler. You must also call Gio::Application::activate() in the signal handler, unless you want your application to exit without showing its main window. (Gio::Application is a base class of Gtk::Application.)
IX.II.III.III. Exemple
Voici le code source de l'exemple qui a servi à générer la capture d'écran ci-dessus. Quand vous lancez cet exemple, indiquez un nombre entre 1 et 3 en option de ligne de commande pour voir les diverses options d'empaquetage utilisées.
File: examplewindow.h (For use with gtkmm 4)
#ifndef GTKMM_EXAMPLEWINDOW_H
#define GTKMM_EXAMPLEWINDOW_H

#include <gtkmm.h>

class ExampleWindow : public Gtk::Window
{
public:
  ExampleWindow(int which);
  virtual ~ExampleWindow();

protected:
  //Signal handlers:
  void on_button_quit_clicked();

  //Child widgets:
  Gtk::Button m_button;
  Gtk::Box m_box1;
  Gtk::Box m_boxQuit;
  Gtk::Button m_buttonQuit;

  Gtk::Label m_Label1, m_Label2;

  Gtk::Separator m_separator1, m_separator2;
};

#endif //GTKMM_EXAMPLEWINDOW_H
File: packbox.h (For use with gtkmm 4)
#ifndef GTKMM_EXAMPLE_PACKBOX_H
#define GTKMM_EXAMPLE_PACKBOX_H

#include <gtkmm.h>

class PackBox : public Gtk::Box
{
public:
  PackBox(bool homogeneous = false, int spacing = 0, bool expand = false,
    Gtk::Align align = Gtk::Align::FILL, int margin = 0);

protected:
  Gtk::Button m_buttons[4];
};

#endif //GTKMM_EXAMPLE_PACKBOX_H
File: main.cc (For use with gtkmm 4)
#include "examplewindow.h"
#include <gtkmm/application.h>
#include <iostream>
#include <cstdlib>

#define GTK_APPLICATION_RECEIVES_COMMAND_LINE_ARGUMENTS 0

#if GTK_APPLICATION_RECEIVES_COMMAND_LINE_ARGUMENTS
namespace
{
int on_command_line(const Glib::RefPtr<Gio::ApplicationCommandLine>& command_line,
                    Glib::RefPtr<Gtk::Application>& app)
{
  int argc = 0;
  char** argv = command_line->get_arguments(argc);

  for (int i = 0; i < argc; ++i)
    std::cout << "argv[" << i << "] = " << argv[i] << std::endl;

  app->activate(); // Without activate() the window won't be shown.
  return EXIT_SUCCESS;
}
} // anonymous namespace
#endif


int main(int argc, char *argv[])
{
  if (argc != 2)
  {
    std::cerr << "Usage: example <num>, where <num> is 1, 2, or 3." << std::endl;
    return EXIT_FAILURE;
  }

  int argc1 = argc;

#if GTK_APPLICATION_RECEIVES_COMMAND_LINE_ARGUMENTS
  // The Gio::Application::Flags::HANDLES_COMMAND_LINE flag and the
  // on_command_line() signal handler are not necessary. This program is simpler
  // without them, and with argc = 1 in the call to Gtk::Application::make_window_and_run().
  // They are included to show a program with Gio::Application::Flags::HANDLES_COMMAND_LINE.
  // Gio::Application::Flags::NON_UNIQUE makes it possible to run several instances of
  // this application simultaneously.
  auto app = Gtk::Application::create(
    "org.gtkmm.example", Gio::Application::Flags::HANDLES_COMMAND_LINE | Gio::Application::Flags::NON_UNIQUE);

  // Note after = false.
  // Only one signal handler is invoked. This signal handler must run before
  // the default signal handler, or else it won't run at all.
  app->signal_command_line().connect(sigc::bind(sigc::ptr_fun(&on_command_line), app), false);
#else
  // Gio::Application::Flags::NON_UNIQUE makes it possible to run several instances of
  // this application simultaneously.
  argc1 = 1; // Don't give the command line arguments to Gtk::Application.
  auto app = Gtk::Application::create("org.gtkmm.example", Gio::Application::Flags::NON_UNIQUE);
#endif

  // Shows the window and returns when it is closed.
  return app->make_window_and_run<ExampleWindow>(argc1, argv, std::atoi(argv[1]));
}
File: examplewindow.cc (For use with gtkmm 4)
#include <iostream>
#include "examplewindow.h"
#include "packbox.h"

ExampleWindow::ExampleWindow(int which)
: m_box1(Gtk::Orientation::VERTICAL),
  m_buttonQuit("Quit")
{
  set_title("Gtk::Box example");

  m_separator1.set_margin_top(5);
  m_separator1.set_margin_bottom(5);
  m_separator2.set_margin_top(5);
  m_separator2.set_margin_bottom(5);

  switch(which)
  {
    case 1:
    {
      m_Label1.set_text("Gtk::Box(Gtk::Orientation::HORIZONTAL, 0); set_homogeneous(false);");

      // Align the label to the left side.
      m_Label1.set_halign(Gtk::Align::START);
      m_Label1.set_valign(Gtk::Align::START);

      // Pack the label into the vertical box (vbox box1).  Remember that
      // widgets added to a vbox will be packed one on top of the other in
      // order.
      m_box1.append(m_Label1);

      // Create a PackBox - homogeneous = false, spacing = 0,
      // expand = false, Gtk::Align::FILL, margin = 0
      // These are the default values.
      auto pPackBox = Gtk::make_managed<PackBox>();
      m_box1.append(*pPackBox);

      // Create a PackBox - homogeneous = false, spacing = 0,
      // expand = true, Gtk::Align::CENTER, margin = 0
      pPackBox = Gtk::make_managed<PackBox>(false, 0, true, Gtk::Align::CENTER);
      m_box1.append(*pPackBox);

      // Create a PackBox - homogeneous = false, spacing = 0,
      // expand = true, Gtk::Align::FILL, margin = 0
      pPackBox = Gtk::make_managed<PackBox>(false, 0, true);
      m_box1.append(*pPackBox);

      // pack the separator into the vbox.  Remember each of these
      // widgets are being packed into a vbox, so they'll be stacked
      // vertically.
      m_box1.append(m_separator1);

      // create another new label, and show it.
      m_Label2.set_text("Gtk::Box(Gtk::Orientation::HORIZONTAL, 0); set_homogeneous(true);");
      m_Label2.set_halign(Gtk::Align::START);
      m_Label2.set_valign(Gtk::Align::START);
      m_box1.append(m_Label2);

      // Args are: homogeneous, spacing, expand, align, margin
      pPackBox = Gtk::make_managed<PackBox>(true, 0, true, Gtk::Align::CENTER);
      m_box1.append(*pPackBox);

      // Args are: homogeneous, spacing, expand, align, margin
      pPackBox = Gtk::make_managed<PackBox>(true, 0, true);
      m_box1.append(*pPackBox);

      m_box1.append(m_separator2);

      break;
    }

    case 2:
    {
      m_Label1.set_text("Gtk::Box(Gtk::Orientation::HORIZONTAL, 10); set_homogeneous(false);");
      m_Label1.set_halign(Gtk::Align::START);
      m_Label1.set_valign(Gtk::Align::START);
      m_box1.append(m_Label1);

      auto pPackBox = Gtk::make_managed<PackBox>(false, 10, true, Gtk::Align::CENTER);
      m_box1.append(*pPackBox);

      pPackBox = Gtk::make_managed<PackBox>(false, 10, true);
      m_box1.append(*pPackBox);

      m_box1.append(m_separator1);

      m_Label2.set_text("Gtk::Box(Gtk::Orientation::HORIZONTAL, 0); set_homogeneous(false);");
      m_Label2.set_halign(Gtk::Align::START);
      m_Label2.set_valign(Gtk::Align::START);
      m_box1.append(m_Label2);

      pPackBox = Gtk::make_managed<PackBox>(false, 0, false, Gtk::Align::FILL, 10);
      m_box1.append(*pPackBox);

      pPackBox = Gtk::make_managed<PackBox>(false, 0, true, Gtk::Align::FILL, 10);
      m_box1.append(*pPackBox);

      m_box1.append(m_separator2);

      break;
    }

    case 3:
    {
      // This demonstrates the ability to use Gtk::Align::END to
      // right justify widgets.  First, we create a new box as before.
      auto pPackBox = Gtk::make_managed<PackBox>();

      // create the label that will be put at the end.
      m_Label1.set_text("end");

      // pack it using Gtk::Align::END, so it is put on the right side
      // of the PackBox.
      m_Label1.set_halign(Gtk::Align::END);
      m_Label1.set_hexpand(true);
      pPackBox->append(m_Label1);

      m_box1.append(*pPackBox);

      // This explicitly sets the separator to 700 pixels wide by 5 pixels
      // high.  This is so the hbox we created will also be 700 pixels wide,
      // and the "end" label will be separated from the other labels in the
      // hbox.  Otherwise, all the widgets in the hbox would be packed as
      // close together as possible.
      m_separator1.set_size_request(700, 5);

      // pack the separator into the vbox.
      m_box1.append(m_separator1);

      break;
    }

    default:
    {
      std::cerr << "Unexpected command-line option." << std::endl;
      break;
    }
  }

  // Connect the signal to hide the window:
  m_buttonQuit.signal_clicked().connect( sigc::mem_fun(*this,
              &ExampleWindow::on_button_quit_clicked) );

  // pack the button into the quitbox.
  m_boxQuit.append(m_buttonQuit);
  m_buttonQuit.set_hexpand(true);
  m_buttonQuit.set_halign(Gtk::Align::CENTER);
  m_box1.append(m_boxQuit);

  // pack the vbox (box1) which now contains all our widgets, into the
  // main window.
  set_child(m_box1);
}

ExampleWindow::~ExampleWindow()
{
}

void ExampleWindow::on_button_quit_clicked()
{
  hide();
}
File: packbox.cc (For use with gtkmm 4)
#include "packbox.h"
#include <map>

namespace
{
  const std::map<Gtk::Align, Glib::ustring> align_string = {
    {Gtk::Align::FILL, "Gtk::Align::FILL"},
    {Gtk::Align::START, "Gtk::Align::START"},
    {Gtk::Align::END, "Gtk::Align::END"},
    {Gtk::Align::CENTER, "Gtk::Align::CENTER"},
    {Gtk::Align::BASELINE, "Gtk::Align::BASELINE"},
  };
}

PackBox::PackBox(bool homogeneous, int spacing, bool expand, Gtk::Align align, int margin)
: Gtk::Box(Gtk::Orientation::HORIZONTAL, spacing)
{
  set_homogeneous(homogeneous);

  m_buttons[0].set_label("box.append(button);");
  m_buttons[1].set_label("expand=" + Glib::ustring(expand ? "true" : "false"));
  m_buttons[2].set_label(align_string.at(align));
  m_buttons[3].set_label("margin=" + Glib::ustring::format(margin));

  for (auto& button : m_buttons)
  {
    append(button);
    button.set_hexpand(expand);
    button.set_halign(align);
    button.set_margin_start(margin);
    button.set_margin_end(margin);
  }
}
IX.II.IV. Grille
A Grid dynamically lays out child widgets in rows and columns. The dimensions of the grid do not need to be specified in the constructor.
Child widgets can span multiple rows or columns, using attach(), or added next to an existing widget inside the grid with attach_next_to(). Individual rows and columns of the grid can be set to have uniform height or width with set_row_homogeneous() and set_column_homogeneous().
You can set the margin and expand properties of the child Widgets to control their spacing and their behaviour when the Grid is resized.
- IX.II.IV.I. Exemple
IX.II.IV.I. Exemple
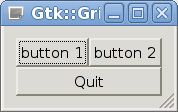
This example creates a window with three buttons in a grid. The first two buttons are in the upper row, from left to right. A third button is attached underneath the first button, in a new lower row, spanning two columns.
File: examplewindow.h (For use with gtkmm 4)
#ifndef GTKMM_EXAMPLEWINDOW_H
#define GTKMM_EXAMPLEWINDOW_H

#include <gtkmm.h>

class ExampleWindow : public Gtk::Window
{
public:
  ExampleWindow();
  virtual ~ExampleWindow();

private:
  // Signal handlers:
  void on_button_quit();
  void on_button_numbered(const Glib::ustring& data);

  // Child widgets:
  Gtk::Grid m_grid;
  Gtk::Button m_button_1, m_button_2, m_button_quit;
};

#endif /* GTKMM_EXAMPLEWINDOW_H */
File: main.cc (For use with gtkmm 4)
#include "examplewindow.h"
#include <gtkmm/application.h>

int main(int argc, char *argv[])
{
  auto app = Gtk::Application::create("org.gtkmm.example");

  // Shows the window and returns when it is closed.
  return app->make_window_and_run<ExampleWindow>(argc, argv);
}
File: examplewindow.cc (For use with gtkmm 4)
#include <iostream>
#include "examplewindow.h"

ExampleWindow::ExampleWindow()
: m_button_1("button 1"),
  m_button_2("button 2"),
  m_button_quit("Quit")
{
  set_title("Gtk::Grid");

  m_grid.set_margin(12);
  set_child(m_grid);

  m_grid.attach(m_button_1, 0, 0);
  m_grid.attach(m_button_2, 1, 0);
  m_grid.attach_next_to(m_button_quit, m_button_1, Gtk::PositionType::BOTTOM, 2, 1);

  m_button_1.signal_clicked().connect(
    sigc::bind( sigc::mem_fun(*this, &ExampleWindow::on_button_numbered), "button 1") );
  m_button_2.signal_clicked().connect(
    sigc::bind( sigc::mem_fun(*this, &ExampleWindow::on_button_numbered), "button 2") );

  m_button_quit.signal_clicked().connect(sigc::mem_fun(*this,
    &ExampleWindow::on_button_quit) );
}

ExampleWindow::~ExampleWindow()
{
}

void ExampleWindow::on_button_quit()
{
  hide();
}

void
ExampleWindow::on_button_numbered(const Glib::ustring& data)
{
  std::cout << data << " was pressed" << std::endl;
}
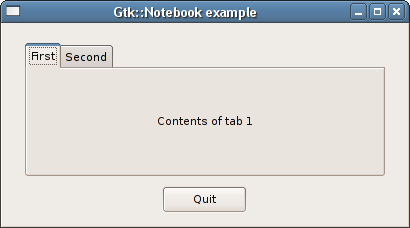
IX.II.V. Bloc-note
L'objet Notebook est constitué d'un jeu de pages empilées, chacune contenant des éléments graphiques. Les onglets étiquetés permettent à l'utilisateur de choisir les pages. Notebook permet de placer plusieurs jeux d'éléments graphiques dans un espace réduit, mais en ne montrant qu'une seule page à la fois. Cet objet est souvent utilisé, par exemple, dans les boîtes de dialogue de préférences.
Servez-vous des fonctions membres append_page(), prepend_page() et insert_page() pour ajouter des pages à onglets dans l'objet Notebook en précisant l'élément graphique enfant et le nom de l'onglet.
Pour connaître la page actuellement affichée, utilisez la fonction membre get_current_page(). Elle renvoie un numéro de page, puis, en appelant get_nth_page() avec ce numéro de page, vous obtiendrez un pointeur sur l'élément graphique enfant de la page.
Pour changer de page sélectionnée au cours du programme, utilisez la fonction membre set_current_page().
- IX.II.V.I. Exemple
IX.II.V.I. Exemple
File: examplewindow.h (For use with gtkmm 4)
#ifndef GTKMM_EXAMPLEWINDOW_H
#define GTKMM_EXAMPLEWINDOW_H

#include <gtkmm.h>

class ExampleWindow : public Gtk::Window
{
public:
  ExampleWindow();
  virtual ~ExampleWindow();

protected:
  //Signal handlers:
  void on_button_quit();
  void on_notebook_switch_page(Gtk::Widget* page, guint page_num);

  //Child widgets:
  Gtk::Box m_VBox;
  Gtk::Notebook m_Notebook;
  Gtk::Label m_Label1, m_Label2;

  Gtk::Box m_ButtonBox;
  Gtk::Button m_Button_Quit;
};

#endif //GTKMM_EXAMPLEWINDOW_H
File: main.cc (For use with gtkmm 4)
#include "examplewindow.h"
#include <gtkmm/application.h>

int main(int argc, char *argv[])
{
  auto app = Gtk::Application::create("org.gtkmm.example");

  //Shows the window and returns when it is closed.
  return app->make_window_and_run<ExampleWindow>(argc, argv);
}
File: examplewindow.cc (For use with gtkmm 4)
#include <iostream>
#include "examplewindow.h"

ExampleWindow::ExampleWindow()
: m_VBox(Gtk::Orientation::VERTICAL),
  m_Label1("Contents of tab 1"),
  m_Label2("Contents of tab 2"),
  m_Button_Quit("Quit")
{
  set_title("Gtk::Notebook example");
  set_default_size(400, 200);

  m_VBox.set_margin(10);
  set_child(m_VBox);

  //Add the Notebook, with the button underneath:
  m_Notebook.set_margin(10);
  m_Notebook.set_expand();
  m_VBox.append(m_Notebook);
  m_VBox.append(m_ButtonBox);

  m_ButtonBox.append(m_Button_Quit);
  m_Button_Quit.set_hexpand(true);
  m_Button_Quit.set_halign(Gtk::Align::CENTER);
  m_Button_Quit.signal_clicked().connect(sigc::mem_fun(*this,
              &ExampleWindow::on_button_quit) );

  //Add the Notebook pages:
  m_Notebook.append_page(m_Label1, "First");
  m_Notebook.append_page(m_Label2, "Second");

  m_Notebook.signal_switch_page().connect(sigc::mem_fun(*this,
              &ExampleWindow::on_notebook_switch_page) );
}

ExampleWindow::~ExampleWindow()
{
}

void ExampleWindow::on_button_quit()
{
  hide();
}

void ExampleWindow::on_notebook_switch_page(Gtk::Widget* /* page */, guint page_num)
{
  std::cout << "Switched to tab with index " << page_num << std::endl;

  //You can also use m_Notebook.get_current_page() to get this index.
}
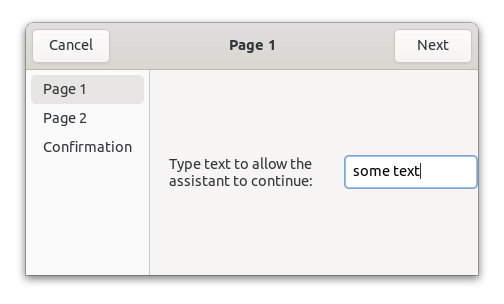
IX.II.VI. Assistant
Un objet Assistant divise une opération complexe en étapes successives. À chaque étape correspond une page, avec un en-tête, un élément graphique enfant et une zone d'action. La zone d'action de l'assistant possède des boutons de navigation qui se mettent à jour automatiquement selon le type de page fixé avec set_page_type().
Utilisez les fonctions membres append_page(), prepend_page et insert_page() pour ajouter des pages à un objet Assistant, tout en indiquant l'élément graphique enfant pour chacune d'entre elles.
Pour connaître la page en cours d'utilisation, servez-vous de la fonction membre get_current_page(), passez le résultat à get_nth_page() qui vous renverra un pointeur sur l'élément graphique affiché. Pour changer en cours de programme la page active, utilisez la fonction membre set_current_page().
To set the title of a page, use the set_page_title() method.
Pour ajouter des éléments graphiques dans la zone d'action, utilisez la fonction membre add_action_widget(). Ils seront empaquetés à côté des boutons par défaut. Servez-vous de la fonction membre remove_action_widget() pour enlever des éléments graphiques.
- IX.II.VI.I. Exemple
IX.II.VI.I. Exemple
File: examplewindow.h (For use with gtkmm 4)
#ifndef GTKMM_EXAMPLEWINDOW_H
#define GTKMM_EXAMPLEWINDOW_H

#include "exampleassistant.h"
#include <gtkmm.h>

class ExampleWindow : public Gtk::Window
{
public:
  ExampleWindow();
  virtual ~ExampleWindow();

private:
  // Signal handlers:
  void on_button_clicked();
  void on_assistant_apply();

  // Child widgets:
  Gtk::Grid m_grid;
  Gtk::Button m_button;
  Gtk::Label m_label1, m_label2;
  Gtk::CheckButton m_check;
  Gtk::Entry m_entry;
  ExampleAssistant m_assistant;
};

#endif /* GTKMM_EXAMPLEWINDOW_H */
File: exampleassistant.h (For use with gtkmm 4)
#ifndef GTKMM_EXAMPLEASSISTANT_H
#define GTKMM_EXAMPLEASSISTANT_H

#include <gtkmm.h>

class ExampleAssistant : public Gtk::Assistant
{
public:
  ExampleAssistant();
  virtual ~ExampleAssistant();

  void get_result(bool& check_state, Glib::ustring& entry_text);

private:
  // Signal handlers:
  void on_assistant_apply();
  void on_assistant_cancel();
  void on_assistant_close();
  void on_assistant_prepare(Gtk::Widget* widget);
  void on_entry_changed();

  // Member functions:
  void print_status();

  // Child widgets:
  Gtk::Box m_box;
  Gtk::Label m_label1, m_label2;
  Gtk::CheckButton m_check;
  Gtk::Entry m_entry;
};

#endif /* GTKMM_EXAMPLEASSISTANT_H */
File: main.cc (For use with gtkmm 4)
#include "examplewindow.h"
#include <gtkmm/application.h>

int main(int argc, char *argv[])
{
  auto app = Gtk::Application::create("org.gtkmm.example");

  // Shows the window and returns when it is closed.
  return app->make_window_and_run<ExampleWindow>(argc, argv);
}
File: examplewindow.cc (For use with gtkmm 4)
#include "examplewindow.h"
#include "exampleassistant.h"

ExampleWindow::ExampleWindow()
: m_button("Show the assistant"),
  m_label1("State of assistant checkbutton:", Gtk::Align::START, Gtk::Align::CENTER),
  m_label2("Contents of assistant entry:", Gtk::Align::START, Gtk::Align::CENTER)
{
  set_title("Gtk::Assistant example");

  m_grid.set_row_homogeneous(true);
  m_grid.set_column_spacing(5);
  m_grid.set_margin(12);

  m_grid.attach(m_button, 0, 0, 2, 1);
  m_button.set_hexpand(true);
  m_button.set_valign(Gtk::Align::CENTER);

  m_grid.attach(m_label1, 0, 1, 1, 1);

  m_grid.attach(m_label2, 0, 2, 1, 1);

  m_grid.attach(m_check, 1, 1, 1, 1);
  m_check.set_halign(Gtk::Align::START);

  m_grid.attach(m_entry, 1, 2, 1, 1);
  m_entry.set_hexpand(true);

  set_child(m_grid);

  m_button.signal_clicked().connect(sigc::mem_fun(*this,
    &ExampleWindow::on_button_clicked));
  m_assistant.signal_apply().connect(sigc::mem_fun(*this,
    &ExampleWindow::on_assistant_apply));

  m_check.set_sensitive(false);
  m_entry.set_sensitive(false);
}

ExampleWindow::~ExampleWindow()
{
}

void ExampleWindow::on_assistant_apply()
{
  bool check_state;
  Glib::ustring entry_text;

  m_assistant.get_result(check_state, entry_text);
  m_check.set_active(check_state);
  m_entry.set_text(entry_text);
}

void ExampleWindow::on_button_clicked()
{
  m_assistant.show();
}
File: exampleassistant.cc (For use with gtkmm 4)
#include <iostream>
#include "exampleassistant.h"

ExampleAssistant::ExampleAssistant()
: m_box(Gtk::Orientation::HORIZONTAL, 12),
  m_label1("Type text to allow the assistant to continue:"),
  m_label2("Confirmation page"),
  m_check("Optional extra information")
{
  set_title("Gtk::Assistant example");
  set_default_size(400, 200);

  m_box.append(m_label1);
  m_box.append(m_entry);
  m_label1.set_wrap();
  m_label1.set_valign(Gtk::Align::CENTER);
  m_entry.set_valign(Gtk::Align::CENTER);

  append_page(m_box);
  append_page(m_check);
  append_page(m_label2);

  set_page_title(*get_nth_page(0), "Page 1");
  set_page_title(*get_nth_page(1), "Page 2");
  set_page_title(*get_nth_page(2), "Confirmation");

  set_page_complete(m_check, true);
  set_page_complete(m_label2, true);

  set_page_type(m_box, Gtk::AssistantPage::Type::INTRO);
  set_page_type(m_label2, Gtk::AssistantPage::Type::CONFIRM);

  signal_apply().connect(sigc::mem_fun(*this,
    &ExampleAssistant::on_assistant_apply));
  signal_cancel().connect(sigc::mem_fun(*this,
    &ExampleAssistant::on_assistant_cancel));
  signal_close().connect(sigc::mem_fun(*this,
    &ExampleAssistant::on_assistant_close));
  signal_prepare().connect(sigc::mem_fun(*this,
    &ExampleAssistant::on_assistant_prepare));

  m_entry.signal_changed().connect(sigc::mem_fun(*this,
    &ExampleAssistant::on_entry_changed));
}

ExampleAssistant::~ExampleAssistant()
{
}

void ExampleAssistant::get_result(bool& check_state, Glib::ustring& entry_text)
{
  check_state = m_check.get_active();
  entry_text = m_entry.get_text();
}

void ExampleAssistant::on_assistant_apply()
{
  std::cout << "Apply was clicked";
  print_status();
}

void ExampleAssistant::on_assistant_cancel()
{
  std::cout << "Cancel was clicked";
  print_status();
  hide();
}

void ExampleAssistant::on_assistant_close()
{
  std::cout << "Assistant was closed";
  print_status();
  hide();
}

void ExampleAssistant::on_assistant_prepare(Gtk::Widget* /* widget */)
{
  set_title(Glib::ustring::compose("Gtk::Assistant example (Page %1 of %2)",
    get_current_page() + 1, get_n_pages()));
}

void ExampleAssistant::on_entry_changed()
{
  // The page is only complete if the entry contains text.
  if(m_entry.get_text_length())
    set_page_complete(m_box, true);
  else
    set_page_complete(m_box, false);
}

void ExampleAssistant::print_status()
{
  std::cout << ", entry contents: \"" << m_entry.get_text()
    << "\", checkbutton status: " << m_check.get_active() << std::endl;
}