Hello World en gtkmm
Nous en savons maintenant assez pour examiner un exemple réel. Pour reprendre une vieille tradition du monde de l'informatique, nous allons maintenant présenter le programme « Hello World » accommodé à la gtkmm :
File: helloworld.h (For use with gtkmm 4)
#ifndef GTKMM_EXAMPLE_HELLOWORLD_H
#define GTKMM_EXAMPLE_HELLOWORLD_H

#include <gtkmm/button.h>
#include <gtkmm/window.h>

class HelloWorld : public Gtk::Window
{

public:
  HelloWorld();
  ~HelloWorld() override;

protected:
  //Signal handlers:
  void on_button_clicked();

  //Member widgets:
  Gtk::Button m_button;
};

#endif // GTKMM_EXAMPLE_HELLOWORLD_H
File: main.cc (For use with gtkmm 4)
#include "helloworld.h"
#include <gtkmm/application.h>

int main(int argc, char* argv[])
{
  auto app = Gtk::Application::create("org.gtkmm.example");

  //Shows the window and returns when it is closed.
  return app->make_window_and_run<HelloWorld>(argc, argv);
}
File: helloworld.cc (For use with gtkmm 4)
#include "helloworld.h"
#include <iostream>

HelloWorld::HelloWorld()
: m_button("Hello World")   // creates a new button with label "Hello World".
{
  // Sets the margin around the button.
  m_button.set_margin(10);

  // When the button receives the "clicked" signal, it will call the
  // on_button_clicked() method defined below.
  m_button.signal_clicked().connect(sigc::mem_fun(*this,
              &HelloWorld::on_button_clicked));

  // This packs the button into the Window (a container).
  set_child(m_button);
}

HelloWorld::~HelloWorld()
{
}

void HelloWorld::on_button_clicked()
{
  std::cout << "Hello World" << std::endl;
}
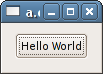
Essayez de le compiler et de le lancer avant de poursuivre. Vous devriez voir quelque chose comme :
Tout à fait palpitant, n'est-ce-pas ? Examinons le code. D'abord, la classe HelloWorld :
class HelloWorld : public Gtk::Window
{
public:
  HelloWorld();
  ~HelloWorld() override;

protected:
  //Signal handlers:
  void on_button_clicked();

  //Member widgets:
  Gtk::Button m_button;
};
Cette classe implémente la fenêtre « Hello World ». Elle est dérivée de la classe Gtk::Window et possède un simple Gtk::Button comme membre. Nous avons pris le parti d'utiliser le constructeur pour faire toutes les tâches d'initialisation de la fenêtre, y compris la définition des signaux. Voici le code, les commentaires sont omis :
HelloWorld::HelloWorld()
: m_button("Hello World")
{
  m_button.set_margin(10);
  m_button.signal_clicked().connect(sigc::mem_fun(*this,
    &HelloWorld::on_button_clicked));
  set_child(m_button);
}
Notez que nous avons utilisé une instruction d'initialisation pour étiqueter l'objet m_button avec « Hello World ».
Next we call the Button's set_margin() method. This sets the amount of space around the button.
Ensuite, nous raccordons un gestionnaire de signal pour le signal clicked du m_button. Le gestionnaire affiche sur stdout notre salut amical.
Next, we use the Window's set_child() method to put m_button in the Window. The set_child() method places the Widget in the Window.
Maintenant examinons la fonction main() du programme. La voici, sans commentaire :
int main(int argc, char* argv[])
{
  auto app = Gtk::Application::create("org.gtkmm.example");
  HelloWorld helloworld;
  return app->run(helloworld, argc, argv);
}
First we instantiate an object stored in a RefPtr smartpointer called app. This is of type Gtk::Application. Every gtkmm program must have one of these.
Next we make an object of our HelloWorld class, whose constructor takes no arguments, but it isn't visible yet. When we call Gtk::Application::run(), giving it the helloworld Window and the command-line arguments, it shows the Window and starts the gtkmm event loop. During the event loop gtkmm idles, waiting for actions from the user, and responding appropriately. When the user closes the Window, run() will return, causing the final line of our main() function be to executed. The application will then finish.
Like the simple example we showed earlier, this Hello World program does not use the command-line parameters. It's not necessary to pass them to run().