In this tutorial, you will learn:
How to connect to a database using libgda
How to insert and browse records in a database table
This demo uses the Javascript language. We are going to demonstrate how to connect and use a database from a GTK program, by using the GDA (GNOME Data Access) library. Thus you also need this library installed.
GNOME Data Access (GDA) is library whose purpose is to provide universal access to different kinds and types of data sources. This goes from traditional relational database systems, to any imaginable kind of data source such as a mail server, a LDAP directory, etc. For more information, and for a full API and documentation, visit the GDA website.
Although a big part of the code is related to user interface (GUI), we are going to focus our tutorial on the database parts (we might mention other parts we think are relevant though). To know more about Javascript programs in GNOME, see the Image Viewer program tutorial.
Before you start coding, you'll need to set up a new project in Anjuta. This will create all of the files you need to build and run the code later on. It's also useful for keeping everything together.
Start Anjuta and click File ▸ New ▸ Project to open the project wizard.
Choose Generic Javascript from the JS tab, click Forward, and fill-out your details on the next few pages. Use record-collection as project name and directory.
Click Finished and the project will be created for you. Open src/main.js from the Project or File tabs. It contains very basic example code.
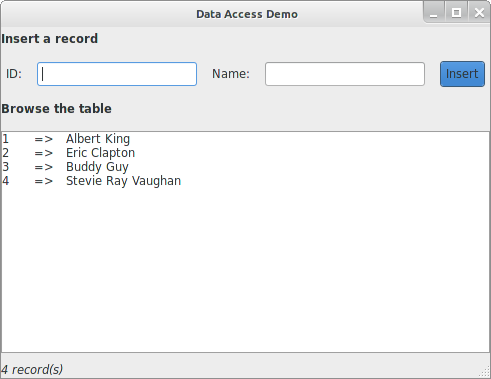
This demo is a simple GTK application (with a single window) capable of inserting records into a database table as well as browsing all records of the table. The table has two fields: id, an integer, and name, a varchar. The first section (on the top) of the application allows you to insert a record into the table. The last section (bottom) allows you to see all the records of that table. Its content is refreshed every time a new record is inserted and on the application startup.
Let's start by examining the skeleton of the program:
1
2
3
4
5
6
7
8
9
10
11
12
13
14
15
16
17
18
19
20
21
22
23
const GLib = imports.gi.GLib;
const Gtk = imports.gi.Gtk;
const Gda = imports.gi.Gda;
const Lang = imports.lang;

function Demo () {
  this._init ();
}

Demo.prototype = {

  _init: function () {
    this.setupWindow ();
    this.setupDatabase ();
    this.selectData ();
  }
}

Gtk.init (null, null);

var demo = new Demo ();

Gtk.main ();
Lines 1‒4: Initial imports. Pay special attention to line 3, which tells Javascript to import the GDA library, our focus in this tutorial.
Lines 6‒17: Define our Demo class. Pay special attention to lines 13‒15, where we call 3 methods which will do the whole job. They will be detailed below.
Lines 19‒23: Start the application.
Let's take a look at the setupWindow method. It is responsible for creating the User Interface (UI). As UI is not our focus, we will explain only the relevant parts.
1
2
3
4
5
6
7
8
9
10
11
12
13
14
15
16
17
18
19
20
21
22
23
24
25
26
27
28
29
30
31
32
33
34
35
36
37
38
39
40
41
42
43
44
45
46
47
48
  setupWindow: function () {
    this.window = new Gtk.Window ({title: "Data Access Demo", height_request: 350});
    this.window.connect ("delete-event", function () {
      Gtk.main_quit();
      return true;
      });

    // main box
    var main_box = new Gtk.Box ({orientation: Gtk.Orientation.VERTICAL, spacing: 5});
    this.window.add (main_box);

    // first label
    var info1 = new Gtk.Label ({label: "<b>Insert a record</b>", xalign: 0, use_markup: true});
    main_box.pack_start (info1, false, false, 5);

    // "insert a record" horizontal box
    var insert_box = new Gtk.Box ({orientation: Gtk.Orientation.HORIZONTAL, spacing: 5});
    main_box.pack_start (insert_box, false, false, 5);

    // ID field
    insert_box.pack_start (new Gtk.Label ({label: "ID:"}), false, false, 5);
    this.id_entry = new Gtk.Entry ();
    insert_box.pack_start (this.id_entry, false, false, 5);

    // Name field
    insert_box.pack_start (new Gtk.Label ({label: "Name:"}), false, false, 5);
    this.name_entry = new Gtk.Entry ({activates_default: true});
    insert_box.pack_start (this.name_entry, true, true, 5);

    // Insert button
    var insert_button = new Gtk.Button ({label: "Insert", can_default: true});
    insert_button.connect ("clicked", Lang.bind (this, this._insertClicked));
    insert_box.pack_start (insert_button, false, false, 5);
    insert_button.grab_default ();

    // Browse textview
    var info2 = new Gtk.Label ({label: "<b>Browse the table</b>", xalign: 0, use_markup: true});
    main_box.pack_start (info2, false, false, 5);
    this.text = new Gtk.TextView ({editable: false});
    var sw = new Gtk.ScrolledWindow ({shadow_type:Gtk.ShadowType.IN});
    sw.add (this.text);
    main_box.pack_start (sw, true, true, 5);

    this.count_label = new Gtk.Label ({label: "", xalign: 0, use_markup: true});
    main_box.pack_start (this.count_label, false, false, 0);

    this.window.show_all ();
  },
Lines 22 and 27: Create the 2 entries (for the two fields) in which users will type something to get inserted in the database.
Lines 31‒34: Create the Insert button. We connect its clicked signal to the _insertClicked private method of the class. This method is detailed below.
Line 39: Create the widget (TextView) where we will show the contents of the table.
Line 44: Create the label where we will show the number of records in the table. Initially it's empty, it will be updated later.
The code which makes the connection to the database is in the setupDatabase method below:
1
2
3
4
5
6
7
8
9
10
11
  setupDatabase: function () {
    this.connection = new Gda.Connection ({provider: Gda.Config.get_provider("SQLite"),
                                          cnc_string:"DB_DIR=" + GLib.get_home_dir () + ";DB_NAME=gnome_demo"});
    this.connection.open ();

    try {
      var dm = this.connection.execute_select_command ("select * from demo");
    } catch (e) {
      this.connection.execute_non_select_command ("create table demo (id integer, name varchar(100))");
    }
  },
Lines 2‒3: Create the GDA's Connection object. We must supply to its constructor some properties:
provider: One of GDA's supported providers. GDA supports SQLite, MySQL, PostgreSQL, Oracle and many others. For demo purposes we will use a SQLite database, as it comes installed by default in most distributions and it is simple to use (it just uses a file as a database).
cnc_string: The connection string. It may change from provider to provider. The syntax for SQLite is: DB_DIR=PATH;DB_NAME=FILENAME. In this demo we are accessing a database called gnome_demo in the user home dir (note the call to GLib's get_home_dir function).
If the provider is not supported by GDA, or if the connection string is missing some element, line 2 will raise an exception. So, in real life we should handle it with JavaScript's statement try...catch.
Line 4: Open the connection. In the SQLite provider, if the database does not exist, it will be created in this step.
Lines 6‒10: Try to do a simple select to check if the table exists (line 7). If it does not exist (because the database was just created), this command will raise an exception, which is handled by the try...catch block. If it is the case, we run the create table statement (line 9).
In order to run the SQL commands above we are using the GDA connection methods execute_select_command and execute_non_select_command. They are simple to use, and just require two arguments: The Connection object and the SQL command to be parsed.
At this point we have the database set up, and are ready to use it.
After connecting to the database, our demo's constructor calls the selectData method. It is responsible for getting all the records in the table and showing them on the TextView widget. Let's take a look at it:
1
2
3
4
5
6
7
8
9
10
11
12
13
14
15
16
  selectData: function () {
    var dm = this.connection.execute_select_command  ("select * from demo order by 1, 2");
    var iter = dm.create_iter ();

    var text = "";

    while (iter.move_next ()) {
      var id_field = Gda.value_stringify (iter.get_value_at (0));
      var name_field = Gda.value_stringify (iter.get_value_at (1));

      text += id_field + "\t=>\t" + name_field + '\n';
    }

    this.text.buffer.text = text;
    this.count_label.label = "<i>" + dm.get_n_rows () + " record(s)</i>";
  },
Line 2: The SELECT command. We are using the GDA connection's execute_select_command method for that. It returns a DataModel object, which is later used to retrieve the rows.
Line 3: Create an Iter object, which is used to iterate over the DataModel's records.
Line 7: Loop through all the records, fetching them with the help of the Iter object. At this point, the iter variable contains the actual, retrieved data. Its move_next method returns false when it reaches the last record.
Lines 8‒9: We do two things in each line:
Use Iter's method get_value_at, which requires only one argument: the column number to retrieve, starting at 0. As our SELECT command returns only two columns, we are retrieving columns 0 and 1.
The method get_value_at returns the field in GLib's GValue format. A simple way to convert this format to a string is by using GDA's global function value_stringify. That's what we are doing here, and we store the results in the variables id_field and name_field.
Line 11: Concatenate the two fields to make one text line, separated by "=>", and store it in the text variable.
Line 14: After the loop is finished, we have all the records formatted in the text variable. In this line we just set the contents of the TextView with that variable.
Line 15: Display the number of records in the table, making use of the DataModel's get_n_rows method.
OK, we know how to connect to a database and how to select rows from a table. Now it's time to do an INSERT on the table. Do you remember above, in the method setupWindow we connected the Insert button's clicked signal to the method _insertClicked? Let's see the implementation of this method.
1
2
3
4
5
6
7
8
9
10
11
12
13
14
15
16
17
  _insertClicked: function () {
    if (!this._validateFields ())
      return;

    // Gda.execute_non_select_command (this.connection,
    //   "insert into demo values ('" + this.id_entry.text + "', '" + this.name_entry.text + "')");

    var b = new Gda.SqlBuilder ({stmt_type:Gda.SqlStatementType.INSERT});
    b.set_table ("demo");
    b.add_field_value_as_gvalue ("id", this.id_entry.text);
    b.add_field_value_as_gvalue ("name", this.name_entry.text);
    var stmt = b.get_statement ();
    this.connection.statement_execute_non_select (stmt, null);

    this._clearFields ();
    this.selectData ();
  },
We have learned how to use the GDA connection's methods execute_select_command and execute_non_select_command to quickly execute SQL commands on the database. GDA allows one to build a SQL statement indirectly, by using its SqlBuilder object. What are the benefits of this? GDA will generate the SQL statement dynamically, and it will be valid for the connection provider used (it will use the same SQL dialect the provider uses). Let's study the code:
Lines 2‒3: Check if the user filled all the fields. The code for the private method _validateFields is really simple and you can read it in the full demo source code.
Line 5: The faster way of doing the INSERT. It's commented out as we want to show how to use the SqlBuilder object to build a SQL statement portable across databases.
Line 7: Create the SqlBuilder object. We must pass the type of statement we are going to build. It can be SELECT, UPDATE, INSERT or DELETE.
Line 8: Set the name of the table on which the built statement will operate (it will generate INSERT INTO demo)
Lines 9‒10: Set the fields and its values that will be part of the statement. The first argument is the field name (as in the table). The second one is the value for that field.
Line 11: Get the dynamically generated Statement object, which represents a SQL statement.
Line 12: Finally, execute the SQL statement (INSERT).
Line 14: Clear the id and name fields on the screen. The code for the private method _clearFields is really simple and you can read it in the full demo source code.
Line 15: Refresh the view on the screen by doing another SELECT.
You can also make use of parameters while building the statement. By using the SqlBuilder objects and parameters you are less subject to attacks like SQL injection. Check the GDA documentation for more information about parameters.
All of the code you need should now be in place, so try running the code. You now have a database for your record collection!
If you run into problems with the tutorial, compare your code with this reference code.
Got a comment? Spotted an error? Found the instructions unclear? Send feedback about this page.