For this example we will build a simple image viewer using Clutter. You will learn:
How to size and position ClutterActors
How to place an image in a ClutterActor
How to do simple transitions using Clutter's animation framework
How to make ClutterActors respond to mouse events
How to get file names from a directory
Clutter is a library for creating dynamic user interfaces using OpenGL for hardware acceleration. This example demonstrates a small, but central, part of the Clutter library to create a simple but attractive image viewing program.
To help us reach our goal we will be utilising a few other common pieces of GLib as well. Most importantly, we'll use one GPtrArray, a dynamic array of pointers, to hold the file path names. We will also use GDir, a utility for working with directories, to access our image directory and gather file paths.
Before you start coding, you'll need to set up a new project in Anjuta. This will create all of the files you need to build and run the code later on. It's also useful for keeping everything together.
Start Anjuta and click File ▸ New ▸ Project to open the project wizard.
Choose GTK+ (simple) from the C tab, click Continue, and fill out your details on the next few pages. Use photo-wall as project name and directory.
Make sure that Use GtkBuilder for user interface is disabled as we will create the UI manually in this tutorial. Check the Guitar-Tuner tutorial using the interface builder.
Enable Configure external packages. On the next page, select clutter-1.0 from the list to include the Clutter library in your project.
Click Apply and the project will be created for you. Open src/main.c from the Project or File tabs. You should see some code which starts with the lines:
#include <config.h>
#include <gtk/gtk.h>
Our image viewer presents the user with a wall of images.
When an image is clicked, it is animated to fill the viewing area. When the image having focus is clicked it is returned to its original position using an animation with the same duration of 500 milliseconds.

The following code segment contains many of the defines and variables we will be using in the following sections. Use this as a reference for later sections. Copy this code to the beginning of src/main.c:
1
2
3
4
5
6
7
8
9
10
11
12
13
14
15
16
17
18
19
#include <gdk-pixbuf/gdk-pixbuf.h>
#include <clutter/clutter.h>

#define STAGE_WIDTH  800
#define STAGE_HEIGHT 600

#define THUMBNAIL_SIZE 200
#define ROW_COUNT (STAGE_HEIGHT / THUMBNAIL_SIZE)
#define COL_COUNT (STAGE_WIDTH  / THUMBNAIL_SIZE)
#define THUMBNAIL_COUNT (ROW_COUNT * COL_COUNT)

#define ANIMATION_DURATION_MS 500

#define IMAGE_DIR_PATH "./berlin_images/"

static GPtrArray *img_paths;

static ClutterPoint unfocused_pos;
We will start by taking a look at the main() function as a whole. Then we'll discuss the other code sections in detail. Change the src/main.c to contain this main() function. You can delete the create_window() function as we don't need it in this example.
1
2
3
4
5
6
7
8
9
10
11
12
13
14
15
16
17
18
19
20
21
22
23
24
25
26
27
28
29
30
31
32
33
34
35
36
37
38
39
40
41
42
43
44
45
46
47
48
49
50
51
52
53
54
55
56
57
58
59
60
int
main(int argc, char *argv[])
{
    ClutterColor stage_color = { 16, 16, 16, 255 };
    ClutterActor *stage = NULL;

    if (clutter_init (&argc, &argv) != CLUTTER_INIT_SUCCESS)
        return 1;

    stage = clutter_stage_new();
    clutter_actor_set_size(stage, STAGE_WIDTH, STAGE_HEIGHT);
    clutter_actor_set_background_color(stage, &stage_color);
    clutter_stage_set_title(CLUTTER_STAGE (stage), "Photo Wall");
    g_signal_connect(stage, "destroy", G_CALLBACK(clutter_main_quit), NULL);

    load_image_path_names();

    guint row = 0;
    guint col = 0;
    for(row=0; row < ROW_COUNT; ++row)
    {
        for(col=0; col < COL_COUNT; ++col)
        {
            const char *img_path = g_ptr_array_index(img_paths, (row * COL_COUNT) + col);
            GdkPixbuf *pixbuf = gdk_pixbuf_new_from_file_at_size(img_path, STAGE_HEIGHT, STAGE_HEIGHT, NULL);
            ClutterContent *image = clutter_image_new ();
            ClutterActor *actor = clutter_actor_new ();

            if (pixbuf != NULL)
            {
                clutter_image_set_data(CLUTTER_IMAGE(image),
                                       gdk_pixbuf_get_pixels(pixbuf),
                                       gdk_pixbuf_get_has_alpha(pixbuf)
                                           ? COGL_PIXEL_FORMAT_RGBA_8888
                                           : COGL_PIXEL_FORMAT_RGB_888,
                                       gdk_pixbuf_get_width(pixbuf),
                                       gdk_pixbuf_get_height(pixbuf),
                                       gdk_pixbuf_get_rowstride(pixbuf),
                                       NULL);
            }

            clutter_actor_set_content(actor, image);
            g_object_unref(image);
            g_object_unref(pixbuf);

            initialize_actor(actor, row, col);
            clutter_actor_add_child(stage, actor);
        }
    }

    /* Show the stage. */
    clutter_actor_show(stage);

    /* Start the clutter main loop. */
    clutter_main();

    g_ptr_array_unref(img_paths);

    return 0;
}
Line 4: ClutterColor is defined by setting the red, green, blue and transparency (alpha) values. The values range from 0-255. For transparency a value of 255 is opaque.
Line 7: You must initialize Clutter. If you forget to do this, you will get very strange errors. Be warned.
Lines 10‒14: Here we create a new ClutterStage . We then set the size using the defines from the previous section and the address of the ClutterColor we just defined.
A ClutterStage is the top-level ClutterActor onto which other ClutterActors are placed.
Line 16: Here we call our function for getting the image file paths. We'll look at this in a bit.
Lines 18‒49: This is where we set up the ClutterActors, load the images and place them into their spot in the image wall. We will look at this in detail in the next section.
Line 52: Show the stage and all its children, meaning our images.
Line 55: Start the Clutter main loop.
In Clutter, an actor is the most basic visual element. Basically, everything you see is an actor.
In this section, we are going to take a closer look at the loop used for setting up the ClutterActors that will display our images.
1
2
3
4
5
6
7
8
9
10
11
12
13
14
15
16
17
18
19
20
21
22
23
24
25
26
27
28
29
30
31
32
33
guint row = 0;
guint col = 0;
for(row=0; row < ROW_COUNT; ++row)
{
    for(col=0; col < COL_COUNT; ++col)
    {
        const char *img_path = g_ptr_array_index(img_paths, (row * COL_COUNT) + col);
        GdkPixbuf *pixbuf = gdk_pixbuf_new_from_file_at_size(img_path, STAGE_HEIGHT, STAGE_HEIGHT, NULL);
        ClutterContent *image = clutter_image_new ();
        ClutterActor *actor = clutter_actor_new ();

        if (pixbuf != NULL)
        {
            clutter_image_set_data(CLUTTER_IMAGE(image),
                                   gdk_pixbuf_get_pixels(pixbuf),
                                   gdk_pixbuf_get_has_alpha(pixbuf)
                                       ? COGL_PIXEL_FORMAT_RGBA_8888
                                       : COGL_PIXEL_FORMAT_RGB_888,
                                   gdk_pixbuf_get_width(pixbuf),
                                   gdk_pixbuf_get_height(pixbuf),
                                   gdk_pixbuf_get_rowstride(pixbuf),
                                   NULL);
        }

        clutter_actor_set_content(actor, image);
        g_object_unref(image);
        g_object_unref(pixbuf);

        initialize_actor(actor, row, col);
        clutter_actor_add_child(stage, actor);
    }
}
Line 7: Here we want to get the path at the nth location in the GPtrArray that is holding our image path names. The nth position is calculated based on row and col.
Line 8‒23: This is where we actually create the ClutterActor and place the image into the actor. The first argument is the path which we access through our GSList node. The second argument is for error reporting but we are ignoring that to keep things short.
Line 47: This adds the ClutterActor to the stage, which is a container. It also assumes ownership of the ClutterActor which is something you'll want to look into as you get deeper into GNOME development. See the GObject documentation for the gory details.
Let's take a short break from Clutter to see how we can get the file names from our image directory.
1
2
3
4
5
6
7
8
9
10
11
12
13
14
15
16
17
18
19
20
21
22
23
24
25
26
static void
load_image_path_names()
{
    /* Ensure we can access the directory. */
    GError *error = NULL;
    GDir *dir = g_dir_open(IMAGE_DIR_PATH, 0, &error);
    if(error)
    {
        g_warning("g_dir_open() failed with error: %s\n", error->message);
        g_clear_error(&error);
        return;
    }

    img_paths = g_ptr_array_new_with_free_func (g_free);

    const gchar *filename = g_dir_read_name(dir);
    while(filename)
    {
        if(g_str_has_suffix(filename, ".jpg") || g_str_has_suffix(filename, ".png"))
        {
            gchar *path = g_build_filename(IMAGE_DIR_PATH, filename, NULL);
            g_ptr_array_add (img_paths, path);
        }
        filename = g_dir_read_name(dir);
    }
}
Lines 5 and 12: This opens our directory or, if an error occurred, returns after printing an error message.
Lines 16‒25: The first line gets another file name from the GDir we opened earlier. If there was an image file (which we check by looking at its extension, ".png" or ".jpg") in the directory we proceed to prepend the image directory path to the filename and prepend that to the list we set up earlier. Lastly we attempt to get the next path name and reenter the loop if another file was found.
We now take a look at the sizing and positioning of ClutterActors and also readying the ClutterActor for user interaction.
1
2
3
4
5
6
7
8
9
10
11
12
13
/* This function handles setting up and placing the rectangles. */
static void
initialize_actor(ClutterActor *actor, guint row, guint col)
{
    clutter_actor_set_size(actor, THUMBNAIL_SIZE, THUMBNAIL_SIZE);
    clutter_actor_set_position(actor, col * THUMBNAIL_SIZE, row * THUMBNAIL_SIZE);
    clutter_actor_set_reactive(actor, TRUE);

    g_signal_connect(actor,
                     "button-press-event",
                     G_CALLBACK(actor_clicked_cb),
                     NULL);
}
Line 7: Setting an actor reactive means that it reacts to events, such as button-press-event in our case. For Photo Wall, all ClutterActors in the wall should initially be reactive.
Line 9‒12: Now we connect the button-press-event to the actor_clicked_cb callback which we will look at next.
At this point we've got a wall of images that are ready to be viewed.
1
2
3
4
5
6
7
8
9
10
11
12
13
14
15
16
17
18
19
20
21
22
23
24
25
26
27
28
29
30
31
32
33
34
35
36
37
38
39
40
41
42
43
44
45
static gboolean
actor_clicked_cb(ClutterActor *actor,
                 ClutterEvent *event,
                 gpointer      user_data)
{
    /* Flag to keep track of our state. */
    static gboolean is_focused = FALSE;
    ClutterActorIter iter;
    ClutterActor *child;

    /* Reset the focus state on all the images */
    clutter_actor_iter_init (&iter, clutter_actor_get_parent(actor));
    while (clutter_actor_iter_next(&iter, &child))
      clutter_actor_set_reactive(child, is_focused);

    clutter_actor_save_easing_state(actor);
    clutter_actor_set_easing_duration(actor, ANIMATION_DURATION_MS);

    if(is_focused)
    {
        /* Restore the old location and size. */
        clutter_actor_set_position(actor, unfocused_pos.x, unfocused_pos.y);
        clutter_actor_set_size(actor, THUMBNAIL_SIZE, THUMBNAIL_SIZE);
    }
    else
    {
        /* Save the current location before animating. */
        clutter_actor_get_position(actor, &unfocused_pos.x, &unfocused_pos.y);
        /* Only the currently focused image should receive events. */
        clutter_actor_set_reactive(actor, TRUE);

        /* Put the focused image on top. */
        clutter_actor_set_child_above_sibling(clutter_actor_get_parent(actor), actor, NULL);

        clutter_actor_set_position(actor, (STAGE_WIDTH - STAGE_HEIGHT) / 2.0, 0);
        clutter_actor_set_size(actor, STAGE_HEIGHT, STAGE_HEIGHT);
    }

    clutter_actor_restore_easing_state(actor);

    /* Toggle our flag. */
    is_focused = !is_focused;

    return TRUE;
}
Lines 1‒4: We have to make sure our callback function matches the signature required for the button_clicked_event signal. For our example, we will only use the first argument, the ClutterActor that is actually clicked.
A few words on the arguments we are not using in this example. The ClutterEvent is different depending on what event is being handled. For example, a key event produces a ClutterKeyEvent from which you can get the key being pressed among other information. For mouse click events you get a ClutterButtonEvent from which you can get the x and y values. See the Clutter documentation for other ClutterEvent types.
The user_data is what one uses to pass data into the function. A pointer to any data type can be passed in. If you need multiple data to be passed into the callback, you can place the data into a struct and pass its address in.
Line 7: We set up a static flag to track which state we are in: wall mode or focus mode. We start out in wall mode so no image has focus. Thus, we set the flag to FALSE initially.
Line 12‒14: These set the image actors to receive events if they are focused.
Line 16‒17: Here we set the animation duration and save the current state.
Lines 21‒23: Reaching this code means that one image currently has focus and we want to return to wall mode. Setting a position on a ClutterActor begins an animation with the duration that we set in line 17.
Line 24: Reaching this line of code means we are currently in the wall state and are about to give a ClutterActor focus. Here we save the starting position so that we can return to it later.
Line 25: Setting the ClutterActor's reactive property to TRUE makes this ClutterActor react to events. In this focused state the only ClutterActor that we want to receive events will be the ClutterActor being viewed. Clicking on the ClutterActor will return it to its starting position.
Lines 27‒36: This is where we save the current position of the image, set it to receive events and then make it appear above the other images and start animating it to fill the stage.
Line 39: Here we restore the easing state to what was set before we changed it in line 16.
Line 42: Here we toggle the is_focused flag to the current state.
As mentioned previously, the ClutterActors with higher depth values receive events but can allow ClutterActors below them to also receive events. Returning TRUE will stop events from being passed down, while FALSE will pass events down.
Remember, however, that to receive events the ClutterActors must be set reactive.
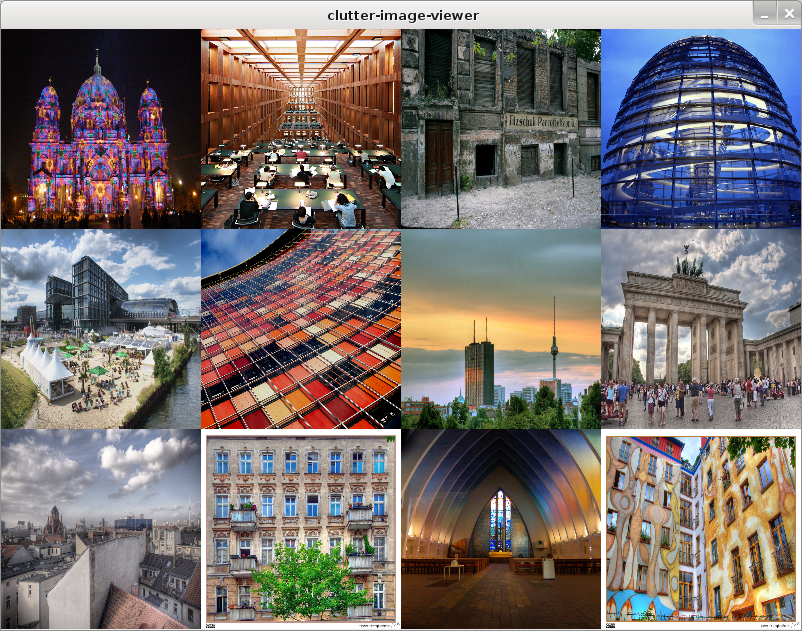
All of the code should now be ready to go. All you need now is some pictures to load. By default, the pictures are loaded from a berlin_images directory. If you want, you can change the #define IMAGE_DIR_PATH line near the top to refer to your photo directory, or create a berlin_images directory by clicking Project ▸ New Directory... and creating a berlin_images directory as a subdirectory of the photo-wall directory. Make sure to put at least twelve images in the directory!
When you have done that, click Build ▸ Build Project to build everything again, then Run ▸ Execute to start the application.
If you haven't already done so, choose the Debug/src/photo-wall application in the dialog that appears. Finally, hit Run and enjoy!
If you run into problems with the tutorial, compare your code with this reference code.
Got a comment? Spotted an error? Found the instructions unclear? Send feedback about this page.