In this tutorial, we're going to make a program which plays tones that you can use to tune a guitar. You will learn how to:
Set up a basic project in Anjuta
Create a simple GUI with Anjuta's UI designer
Use GStreamer to play sounds
You'll need the following to be able to follow this tutorial:
An installed copy of the Anjuta IDE
Basic knowledge of the C programming language
Before you start coding, you'll need to set up a new project in Anjuta. This will create all of the files you need to build and run the code later on. It's also useful for keeping everything together.
Start Anjuta and click File ▸ New ▸ Project to open the project wizard.
Choose GTK+ (Simple) from the C tab, click Continue, and fill out your details on the next few pages. Use guitar-tuner as project name and directory.
Make sure that Configure external packages is switched ON. On the next page, select gstreamer-0.10 from the list to include the GStreamer library in your project.
Click Apply and the project will be created for you. Open src/main.c from the Project or File tabs. You should see some code which starts with the lines:
#include <config.h>
#include <gtk/gtk.h>
C is a rather verbose language, so don't be surprised that the file contains quite a lot of code. Most of it is template code. It loads an (empty) window from the user interface description file and shows it. More details are given below; skip this list if you understand the basics:
The three #include lines at the top include the config (useful autoconf build defines), gtk (user interface) and gi18n (internationalization) libraries. Functions from these libraries are used in the rest of the code.
The create_window function creates a new window by opening a GtkBuilder file (src/guitar-tuner.ui, defined a few lines above), connecting its signals and then displaying it in a window. The GtkBuilder file contains a description of a user interface and all of its elements. You can use Anjuta's editor to design GtkBuilder user interfaces.
Connecting signals is how you define what happens when you push a button, or when some other event happens. Here, the destroy function is called (and quits the app) when you close the window.
The main function is run by default when you start a C application. It calls a few functions which set up and then run the application. The gtk_main function starts the GTK main loop, which runs the user interface and starts listening for events (like clicks and key presses).
The ENABLE_NLS conditional definition sets up gettext, which is a framework for translating applications. These functions specify how translation tools should handle your app when you run them.
This code is ready to be used, so you can compile it by clicking Build ▸ Build Project (or press Shift+F7).
Press Execute on the next window that appears to configure a debug build. You only need to do this once, for the first build.
A description of the user interface (UI) is contained in the GtkBuilder file. To edit the user interface, open src/guitar_tuner.ui. This will switch to the interface designer. The design window is in the center; widgets and widgets' properties are on the left, and the palette of available widgets is on the right.
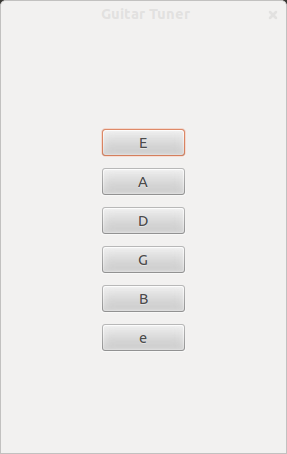
The layout of every UI in GTK+ is organized using boxes and tables. Let's use a vertical GtkButtonBox here to assign six GtkButtons, one for each of the six guitar strings.
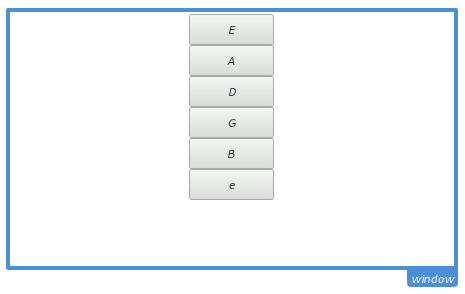
Select a GtkButtonBox from the Container section of the Palette on the right and put it into the window. In the Properties pane, set the number of elements to 6 (for the six strings) and the orientation to vertical.
Now, choose a GtkButton from the palette and put it into the first part of the box.
While the button is still selected, change the Label property in the Widgets tab to E. This will be the low E string.
Switch to the Signals tab (inside the Widgets tab) and look for the clicked signal of the button. You can use this to connect a signal handler that will be called when the button is clicked by the user. To do this, click on the signal and type on_button_clicked in the Handler column and press Return.
Repeat the above steps for the other buttons, adding the next 5 strings with the names A, D, G, B, and e.
Save the UI design (by clicking File ▸ Save) and keep it open.
In the UI designer, you made it so that all of the buttons will call the same function, on_button_clicked, when they are clicked. We need to add that function in the source file.
To do this, open main.c while the user interface file is still open. Switch to the Signals tab, which you already used to set the signal name. Now take the row where you set the clicked signal and drag it into to the source file at a position that is outside any function. The following code will be added to your source file:
void on_button_clicked (GtkWidget* button, gpointer user_data)
{

}
This signal handler has two arguments: a pointer to the GtkWidget that called the function (in our case, always a GtkButton), and a pointer to some "user data" that you can define, but which we won't be using here. (You can set the user data by calling gtk_builder_connect_signals; it is normally used to pass a pointer to a data structure that you might need to access inside the signal handler.)
For now, we'll leave the signal handler empty while we work on writing the code to produce sounds.
GStreamer is GNOME's multimedia framework — you can use it for playing, recording, and processing video, audio, webcam streams and the like. Here, we'll be using it to produce single-frequency tones.
Conceptually, GStreamer works as follows: You create a pipeline containing several processing elements going from the source to the sink (output). The source can be an image file, a video, or a music file, for example, and the output could be a widget or the soundcard.
Between source and sink, you can apply various filters and converters to handle effects, format conversions and so on. Each element of the pipeline has properties which can be used to change its behaviour.
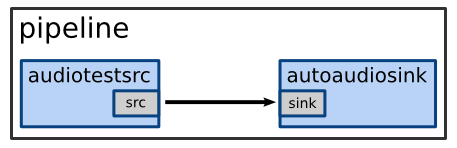
In this simple example we will use a tone generator source called audiotestsrc and send the output to the default system sound device, autoaudiosink. We only need to configure the frequency of the tone generator; this is accessible through the freq property of audiotestsrc.
Insert the following line into main.c, just below the #include <gtk/gtk.h> line:
#include <gst/gst.h>
This includes the GStreamer library. You also need to add a line to initialize GStreamer; put the following code on the line above the gtk_init call in the main function:
gst_init (&argc, &argv);
Then, copy the following function into main.c above the empty on_button_clicked function:
static void
play_sound (gdouble frequency)
{
	GstElement *source, *sink;
	GstElement *pipeline;

	pipeline = gst_pipeline_new ("note");
	source   = gst_element_factory_make ("audiotestsrc",
	                                     "source");
	sink     = gst_element_factory_make ("autoaudiosink",
	                                     "output");

	/* set frequency */
	g_object_set (source, "freq", frequency, NULL);

	gst_bin_add_many (GST_BIN (pipeline), source, sink, NULL);
	gst_element_link (source, sink);

	gst_element_set_state (pipeline, GST_STATE_PLAYING);

	/* stop it after 500ms */
	g_timeout_add (LENGTH, (GSourceFunc) pipeline_stop, pipeline);
}
The first five lines create source and sink GStreamer elements (GstElement), and a pipeline element (which will be used as a container for the other two elements). The pipeline is given the name "note"; the source is named "source" and is set to the audiotestsrc source; and the sink is named "output" and set to the autoaudiosink sink (default sound card output).
The call to g_object_set sets the freq property of the source element to frequency, which is passed as an argument to the play_sound function. This is just the frequency of the note in Hertz; some useful frequencies will be defined later on.
gst_bin_add_many puts the source and sink into the pipeline. The pipeline is a GstBin, which is just an element that can contain multiple other GStreamer elements. In general, you can add as many elements as you like to the pipeline by adding more arguments to gst_bin_add_many.
Next, gst_element_link is used to connect the elements together, so the output of source (a tone) goes into the input of sink (which is then output to the sound card). gst_element_set_state is then used to start playback, by setting the state of the pipeline to playing (GST_STATE_PLAYING).
We don't want to play an annoying tone forever, so the last thing play_sound does is to call g_timeout_add. This sets a timeout for stopping the sound; it waits for LENGTH milliseconds before calling the function pipeline_stop, and will keep calling it until pipeline_stop returns FALSE.
Now, we'll write the pipeline_stop function which is called by g_timeout_add. Insert the following code above the play_sound function:
#define LENGTH 500 /* Length of playing in ms */

static gboolean
pipeline_stop (GstElement* pipeline)
{
	gst_element_set_state (pipeline, GST_STATE_NULL);
	g_object_unref (pipeline);

	return FALSE;
}
The call to gst_element_set_state stops the playback of the pipeline and g_object_unref unreferences the pipeline, destroying it and freeing its memory.
We want to play the correct sound when the user clicks a button. First of all, we need to know the frequencies for the six guitar strings, which are defined (at the top of main.c) as follows:
/* Frequencies of the strings */
#define NOTE_E 329.63
#define NOTE_A 440
#define NOTE_D 587.33
#define NOTE_G 783.99
#define NOTE_B 987.77
#define NOTE_e 1318.5
Now to flesh out the signal handler that we defined earlier, on_button_clicked. We could have connected every button to a different signal handler, but that would lead to a lot of code duplication. Instead, we can use the label of the button to figure out which button was clicked:
/* Callback for the buttons */
void on_button_clicked (GtkButton* button,
                        gpointer user_data)
{
	const gchar* text = gtk_button_get_label (button);

	if (g_str_equal (text, _("E")))
	    play_sound (NOTE_E);
	else if (g_str_equal (text, _("A")))
	    play_sound (NOTE_A);
	else if (g_str_equal (text, _("G")))
	    play_sound (NOTE_G);
	else if (g_str_equal (text, _("D")))
	    play_sound (NOTE_D);
	else if (g_str_equal (text, _("B")))
	    play_sound (NOTE_B);
	else if (g_str_equal (text, _("e")))
	    play_sound (NOTE_e);
}
A pointer to the GtkButton that was clicked is passed as an argument (button) to on_button_clicked. We can get the text of that button using gtk_button_get_label.
The text is then compared to the notes that we have using g_str_equal, and play_sound is called with the frequency appropriate for that note. This plays the tone; we have a working guitar tuner!
All of the code should now be ready to go. Click Build ▸ Build Project to build everything again, and then Run ▸ Execute to start the application.
If you haven't already done so, choose the Debug/src/guitar-tuner application in the dialog that appears. Finally, hit Run and enjoy!
If you run into problems with the tutorial, compare your code with this reference code.
Here are some ideas for how you can extend this simple demonstration:
Have the program automatically cycle through the notes.
Make the program play recordings of real guitar strings being plucked.
To do this, you would need to set up a more complicated GStreamer pipeline which allows you to load and play back music files. You'll have to choose decoder and demuxer GStreamer elements based on the file format of your recorded sounds — MP3s use different elements to Ogg Vorbis files, for example.
You might need to connect the elements in more complicated ways too. This could involve using GStreamer concepts that we didn't cover in this tutorial, such as pads. You may also find the gst-inspect command useful.
Automatically analyze notes that the user plays.
You could connect a microphone and record sounds from it using an input source. Perhaps some form of spectrum analysis would allow you to figure out what notes are being played?
Got a comment? Spotted an error? Found the instructions unclear? Send feedback about this page.